转自苹果官网: 在 Mac 上的“预览”中合并 PDF
将两个或多个 PDF 的全部内容或部分内容合并到单个 PDF。
【警告】你对“预览”文稿所做的更改会自动存储。如果你想保留原始 PDF(除了新合并的 PDF 之外),请在合并前选取“文件”>“复制”来为每个 PDF 创建一个副本。
有几台2019年开的阿里云服务器,当时系统选择了Aliyun Linux 17.1 64位, 因为Let’s Encrypt证书DST-Root-CA-X3过期的原因,访问Let’s Encrypt网站会报SSL错误。
1 | ERROR: cannot verify gems.ruby-china.com's certificate, issued by ‘/C=US/O=Let's Encrypt/CN=R3’: |
如果是CentOS 7系统,直接有现成补丁,直接yum update ca-certificates就可以升级系统证书来应对该问题。
搜了一下,Aliyun Linux 17.1的系统说明,在阿里云官网上已经找不到了,现存的只有Alibaba Cloud Linux 2和Alibaba Cloud Linux 3。 只有在CSDN的一篇文章中找到了一些描述,说Aliyun Linux 17.1是兼容CentOS 7.2的。
在Aliyun Linux 17.1系统中,敲yum update ca-certificates,直接提示No packages marked for update
敲yum install ca-certificates, 提示Package ca-certificates-2015.2.6-73.4.al7.noarch already installed and latest version。
官方yum源中的 ca-certificates 包居然还是2015.2.6的。
转自苹果官网: 在 Mac 上的“预览”中合并 PDF
将两个或多个 PDF 的全部内容或部分内容合并到单个 PDF。
【警告】你对“预览”文稿所做的更改会自动存储。如果你想保留原始 PDF(除了新合并的 PDF 之外),请在合并前选取“文件”>“复制”来为每个 PDF 创建一个副本。
作者:路过mac
来源:稀土掘金
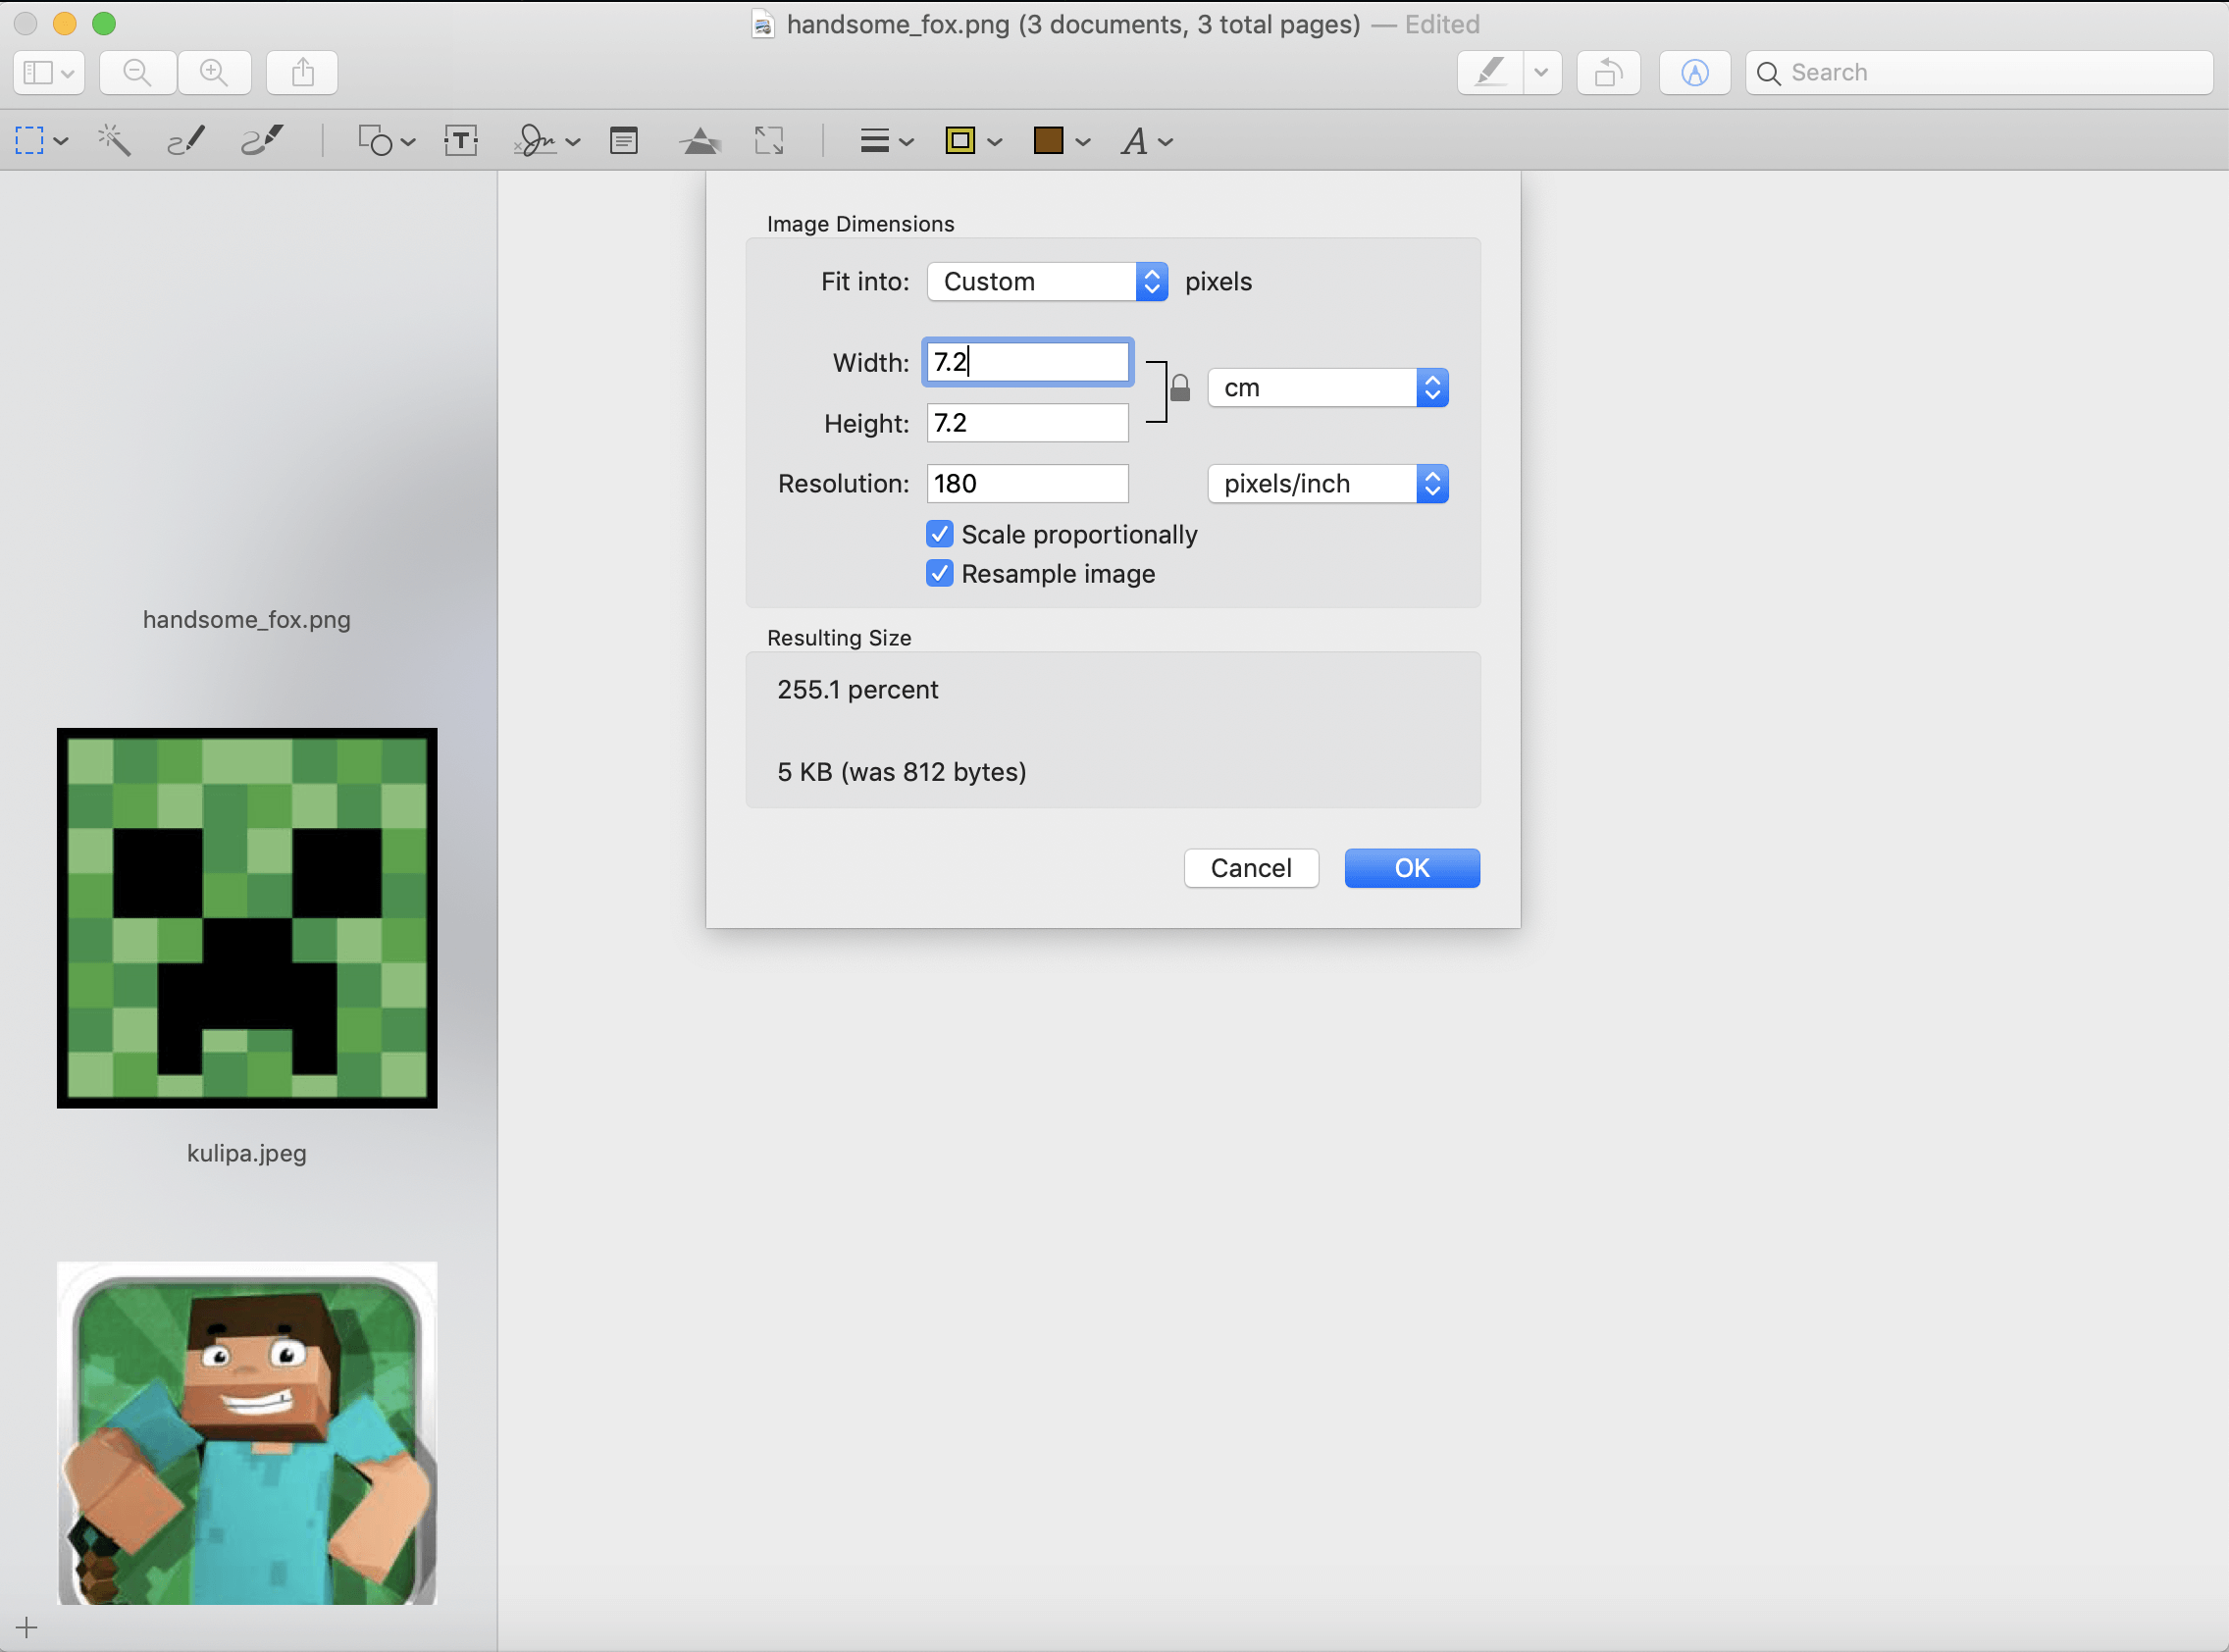
在制作文章配图时,有时需要截取多层窗口的屏幕截图。
在这里,我会使用“预览”来完成这个操作。
在 1 的画布上用「Command+A」「Command+X」全选图片并剪切,然后通过「工具-调整大小」来调整画布尺寸,调整成功后用「Command+V」将图 1 粘贴上去。
本文插件介绍,插件安装和插件使用章节中大多数内容参考转自: Jenkins常用插件Publish Over SSH
可以实现不同节点之间传递文件,比如A节点将代码编译打包好,然后通过ssh发送到目标节点上,配置相应的命令完成项目的部署,目标节点无需是是一个slave,只要A节点能够通过ssh连接到B节点即可。
插件市场搜索Publish Over SSH,然后安装它
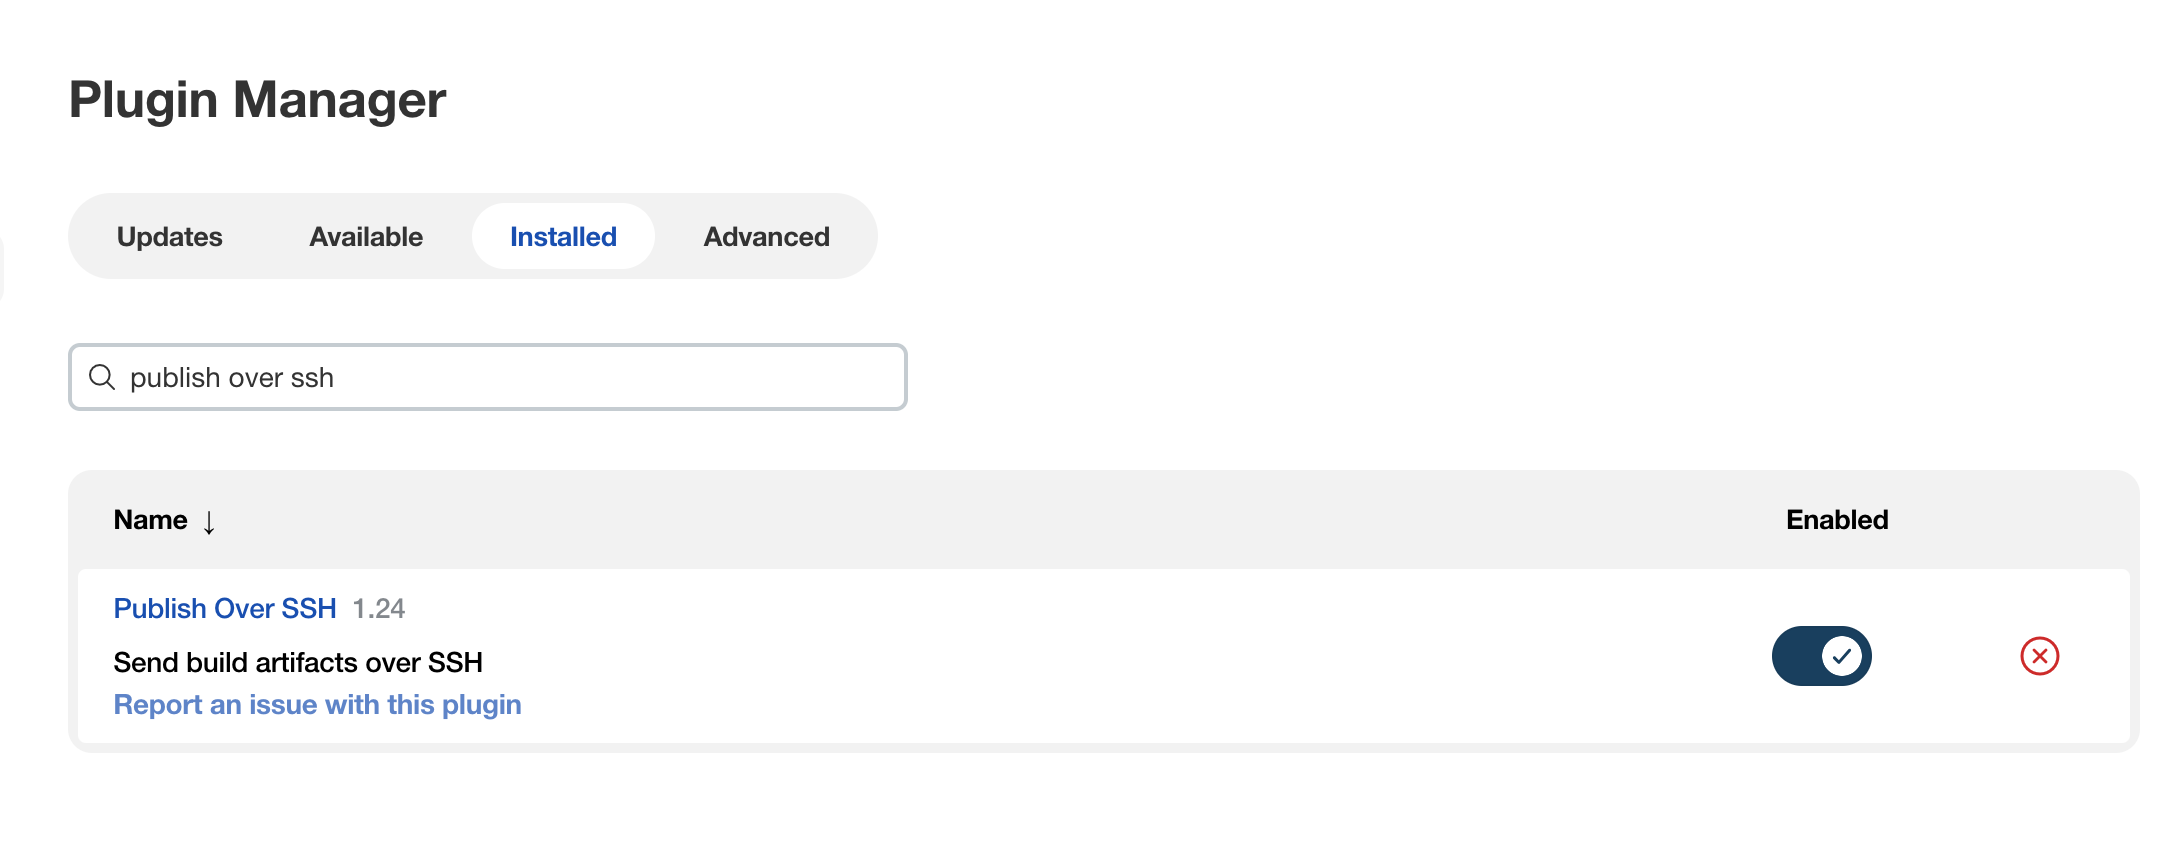
插件主页:https://plugins.jenkins.io/publish-over-ssh
默认情况下,RubyMine的“在文件中搜索”的搜索结果最多只显示100条。
可通过更改设置来显示更多的记录条数。
设置方法:
将对应的数值修改为100以上,比如1000。
有一个提示说:修改这个限值可能会显著增加IDE内存使用量

当我们使用systemd来运行service时,脚本中echo输出的内容不会显示在Terminal中,我们需要使用systemctl status service-name来查看service的日志。
但systemctl status输出的日志信息并不够详细,而且当service的脚本中运行了两个Process,日志比较多时,可能只够显示最后一个Process的日志。
我们可以使用journalctl来查看完整的使用systemctl启动的service的日志。几个典型的用法如下:
1 | # 查看最近的systemctl服务日志, 多个服务混在一起的 |
服务器上运行jenkins的服务一直临时使用的是个人的账号,现在统一要求使用固定的发布账号来进行管理。因此需要将个人账号下的jenkins数据迁移到发布账号下。
一些基本信息:
服务器系统: CentOS 7.x
原账号: carl.shen
新发布账号: deployer-jenkins
发布模式: 在官网手动下载的war包运行部署,不是yum方式。
jenkins的数据是通过自己目录下的xml来进行管理的,没有用到数据库。因此迁移时,只需要将对应的数据文件迁移到新账号指定的目录即可。
为了避免重新配置各个job,因此整个文件夹进行迁移是比较好的方法。
由于是war包运行的方式,因此所有的jenkins数据默认都保存在家目录的~/.jenkins目录下。因此迁移步骤如下:
在旧账号中停止jenkins服务。
打包旧账号中的~/.jenkins的内容,拷贝到新账号的~/.jenkins目录中。
新账号中修改~/.jenkins的文件读写权限为新账号。
新账号中运行jenkins服务。
]]>systemd的全局配置项,涉及这两个conf文件:
以下是来自archlinux网站文章“systemd/User”的介绍解释, 讲的比较详细
systemd 用户实例不会继承类似 .bashrc 中定义的环境变量。systemd 用户实例有三种设置环境变量的方式:
$HOME 目录的用户,可以在 ~/.config/systemd/user.conf 文件中使用 DefaultEnvironment 选项,这些设置只对当前用户的用户单元有效。/etc/systemd/user.conf 文件中使用 DefaultEnvironment 选项。这个配置在所有的用户单元中可见。/etc/systemd/system/user@.service.d/ 下增加配置文件设置。 这个配置在所有的用户单元中可见。systemctl --user set-environment 或 systemctl --user import-environment. 对设置之后启动的所有用户单元有效,但已经启动的用户单元不会生效。xargs systemctl --user set-environment < /path/to/file.conf。可以使用DefaultEnvironment项定义多个全局变量,使用空格分隔开,比如:
DefaultEnvironment=”SYSTEMD_PAGER=cat” “LD_LIBRARY_PATH=/oemapp/lib” “PATH=/oemapp/bin:/usr/sbin:/usr/bin:/sbin:/bin”
另外,网络上这篇文章,也讲的不错: https://www.it610.com/article/1292039680300228608.htm
以上是定义全局环境变量的方法;接下来,参考下述链接文章,对systemd做个摘录介绍。
http://www.ruanyifeng.com/blog/2016/03/systemd-tutorial-commands.html
]]>在systemd中使用脚本配置一个自有java程序的自启动时,发现一个自定义的环境变量无法在systemd中读取,在shell中手动启动就可以正常工作。
上网查了一下systemd读取环境变量的相关知识,最终选择在脚本中source了对应的环境变量文件,解决了问题。
将systemd读取环境变量的机制和几种方法整理罗列如下,以作备忘。
根据systemd/User中的说明如下:
Environment variables
The user instance of systemd does not inherit any of the environment variables set in places like
.bashrcetc. There are several ways to set environment variables for the systemd user instance:
- For users with a
$HOMEdirectory, create a .conf file in the~/.config/environment.d/directory with lines of the formNAME=VAL. Affects only that user’s user unit. See environment.d(5) for more information.- Use the
DefaultEnvironmentoption in/etc/systemd/user.conffile. Affects all user units.- Add a drop-in configuration file in
/etc/systemd/system/user@.service.d/. Affects all user units; see #Service example- At any time, use
systemctl --user set-environmentorsystemctl --user import-environment. Affects all user units started after setting the environment variables, but not the units that were already running.- Using the
dbus-update-activation-environment --systemd --allcommand provided by dbus. Has the same effect assystemctl --user import-environment, but also affects the D-Bus session. You can add this to the end of your shell initialization file.- For “global” environment variables for the user environment you can use the
environment.ddirectories which are parsed by some generators. See environment.d(5) and systemd.generator(7) for more information.- You can also write a systemd.environment-generator(7) script which can produce environment variables that vary from user to user, this is probably the best way if you need per-user environments (this is the case for
XDG_RUNTIME_DIR,DBUS_SESSION_BUS_ADDRESS, etc).One variable you may want to set is
PATH.After configuration, the command
systemctl --user show-environmentcan be used to verify that the values are correct.
搜刮网上的一些说法后,总结如下:
/etc/profile或者/etc/security/limit.d这些文件中配置的环境变量仅对通过pam登录的用户生效,而systemd是不读这些配置的,所以这就造成登录到终端时查看环境变量和手动启动应用都一切正常,但是systemd无法正常启动应用systemd配置默认参数,全局的配置在/etc/systemd/system.conf和/etc/systemd/user.conf中。同时还会加载两个配置文件对应的目录中所有的.conf配置文件/etc/systemd/system.conf.d/*.conf和/etc/systemd/user.conf.d/*.conf,一般的服务单元使用system.conf即可。加载优先级system.conf最低,所以system.conf.d目录中的配置会覆盖system.conf的配置1 | sudo yum install bash-completion |
Ubuntu下:
1 | sudo apt install bash-completion |
安装后退出当前shell重新登录即可获取补全功能。
以CentOS 7下为例。安装了bash-completion后,将会在/etc/profile.d目录下添加文件bash_completion.sh,用于启动bash时候自动添加补全功能。
如果没有自动添加,也可以自己添加,在~/.bashrc中添加
1 | source /usr/share/bash-completion/bash_completion |
各命令补全的脚本存放在/usr/share/bash-completion/completions/目录中。
比如通过yum安装docker后,安装程序会在上述补全脚本目录下添加一个名为docker的文件,就是对应docker命令的补全脚本。
关于命令补全脚本的编写示例,可以参考Bash命令自动补全的原理
]]>按照CentOS7 下搭建简易的L2TP/IPSec 服务搭建好L2TP/IPSec服务后,发现一个问题。
该入口机器上还跑着一些测试服务,有些测试服务是绑定的本机的loopback接口的,只对本机提供服务的。
本机上有一些另外的java服务,使用localhost地址访问这些服务时,发现请求会被解析为使用机器的外网地址来访问这些内网服务,导致java服务出错。
没法一眼看出问题,因此只能通过逐步停到服务的方式,来查看到底是当时搭建L2TP/IPSec的过程中,哪个设置导致了这个问题。
依次停掉ipsec,xl2tpd服务,问题依然存在。
移除firewalld的masquerade设置后,java访问的问题就好了。
感觉是localhost的loopback接口被配置了masquerade导致的问题,便想着有没有什么办法可以将loopback排除在masquerade配置以外,网上一通搜索,找到了一些类似问题,但似乎没有正确的解决办法。
]]>因为只需要设置一个简单的VPN, 查看了下teddysun/across的l2tp.sh比较方便,因此选用了该方法。
在此将脚本中有关CentOS 7的步骤罗列解析一下。方便后续有配置要改动的时候做到心中有数。
脚本化安装步骤如下:
脚本: https://github.com/teddysun/across/blob/master/l2tp.sh
安装环境: VMWare下的虚拟机上的CentOS 7
系统局域网IP: 192.168.172.193, 也是我们VPN的接入IP
2022年1月25日 qualys披露 CVE-2021-4034 polkit pkexec 本地提权漏洞。polkit]]>
1 | sudo amazon-linux-extras install epel |
1 | sudo certbot certonly -d *.examplexxx.com --manual --preferred-challenges dns |
其中:
certonly: 指只生成证书而不部署-d *.examplexxx.com: 指需要生成的是examplexxx.com的通配域名--manual: 指指定交互方式--preferred-challenges dns: 指使用dns方式验证,(泛域名/通配域名只能通过此方式进行)alternatives(update-alternatives)命令用于处理 Linux 系统中软件版本的切换,使其多版本共存。alternatives 的管理目录 /etc/alternatives 。
用法:
1 | # alternatives --help |
以CentOS 7下java命令为例说明alternatives的用法
最小化安装CentOS 7.6, 安装java 8 和java 11
1 | sudo yum install java-11-openjdk-devel |
建立deployer用户
1 | sudo useradd deployer |
建立服务运行目录
1 | sudo mkdir -p /opt/java/ |
将java代码拷贝如/opt/java/目录中,名为Main.jar
~/.ssh/config中指定两个不同的Host。
两个github账号,分别为carl.shen和jibing57,对应使用的key如下:
其中,carl.shen是默认账号,jibing57是第二账号。
两个账号,在~/.ssh/config配置文件中对应的配置如下:
1 | Host "github.com" |
关键点就在于Host "jibing57.github.com"这一几个配置。
该设置的意思是: 当访问Host是jibing57.github.com, 需要使用key ~/.ssh/id_rsa_github来访问,但访问jibing57.github.com时,实际映射到的还是github.com。
通过使用Host别名来实现不同的key同时访问github.com。